
In Aritma Control for Visma Business and Global, during setup you will find the account import menu. This makes it possible to fetch an account from another client and reconcile against an account from the client you are active on. Note that you must be on the client where you want to create the account group, and then create a link to the client where the other account resides. It can be useful for reconciling intercompany balances or customer/supplier relationships across two different clients.
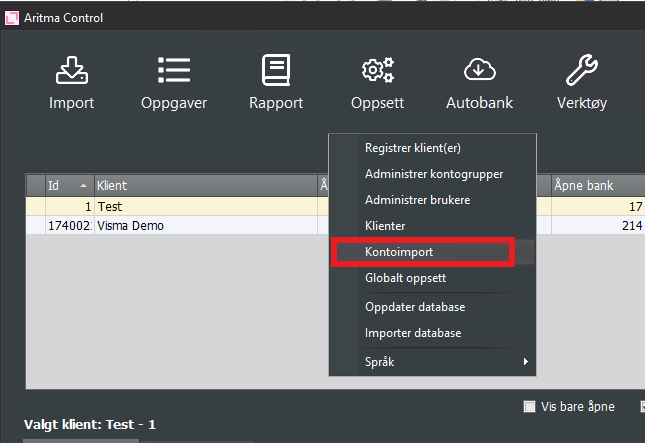
Next, you will reach the menu below:
In this screenshot, we have chosen to retrieve 3 accounts from other clients in the same vbsys/Visma Business for the client named Test (shown above).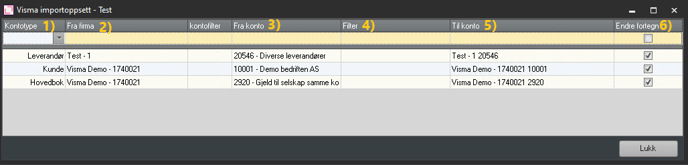
- Her velger man hvilken kontotype man skal hente inn fra den andre klienten. Man kan velge mellom hovedbok, kunde og leverandør. Hva man velger her bestemmer hvilke kontoer man får opp under fra konto (3.)
- Fra firma - her velges hvilken klient man skal hente inn konto fra.
- Konto man ønsker å hente.
- Her kan man sette filter på hvilke transaksjoner som skal hentes. F.eks. kan man velge at kun transaksjoner fra en gitt avdeling skal hentes.
- Navn på konto som man henter inn. Dette er det som vil vise i avstemmingen. Denne kontoen vil bli lagt under "tilgjengelige kontoer" på banksiden i kontoveiviseren
- Endre fortegn. Når man skal hente inn konto fra en annen klient og avstemme mot en konto på klienten man er aktiv, så vil transaksjonene være med motsatt fortegn. Det som er en fordring i klient A vil være gjeld i klient B, derfor velger man alltid endre fortegn når man henter konto fra annen klient. Da blir f.eks. faktura avstemt mot faktura og betaling mot betaling.
Når man har fylt ut på den gule linjen bruker man tab knappen for at ønsket konto skal komme i listen under. Man kan også slette oppsett ved å markere linjen og trykke ctrl + delete.
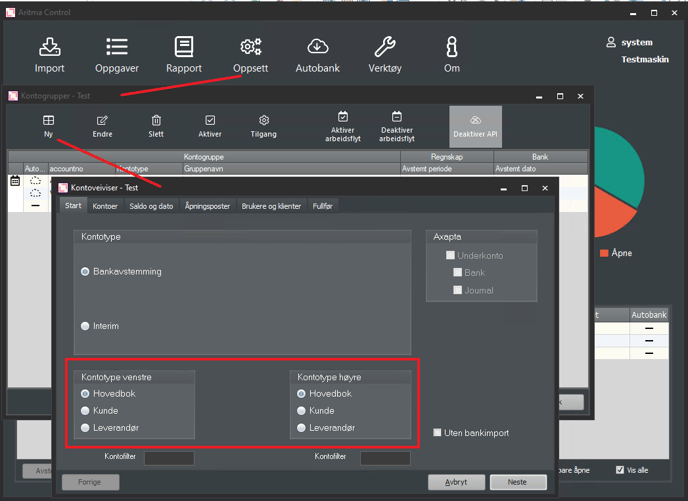
When an account is set up in the account import menu, this account will be available in the account wizard under Bank account, and you set up the account group in the same way as a bank reconciliation:
See this article to get started with setting up the account group:
In the account wizard you select bank reconciliation. Depending on which account you want to reconcile, you check the box for the General Ledger, Customer, or Supplier (both on the left and right account types). This checkbox determines which accounts are shown in the next step of the wizard. If, for example, a customer is to be reconciled, select Customer in this screen.
In the next step in the account reconciliation wizard, you will now see that the accounts you set up under account import appear as available accounts on the bank side:
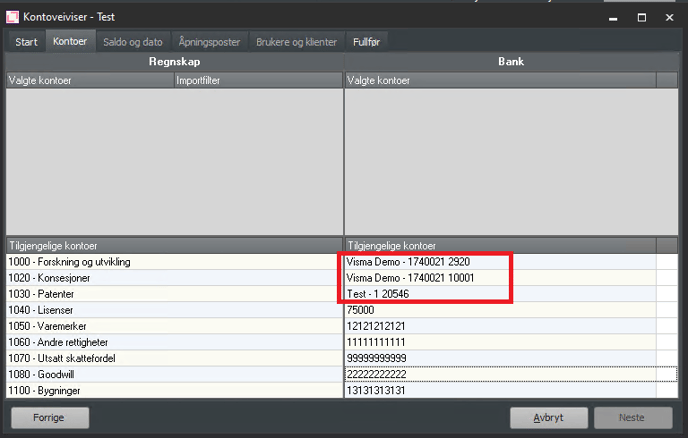
Next, set up the account group as a standard bank reconciliation:
- Select the account from the available accounts under Accounting and Banking that you want to reconcile with each other.
- Select the last reconciled period and balance for both accounts
- Enter any opening entries so that the difference is 0
- Complete setup
The account group will now be ready to reconcile, and each time you click Reconcile on the selected account group, transactions will be retrieved from the accounts linked to the various clients. Rules can also be customized to make reconciliation easier. We can assist with this, but there is also a lot of useful information about rules here: Setting up reconciliation rules in Control